环境
操作系统:ArchLinux
硬件设备:J4125 、4个I226-V千兆网卡
思路
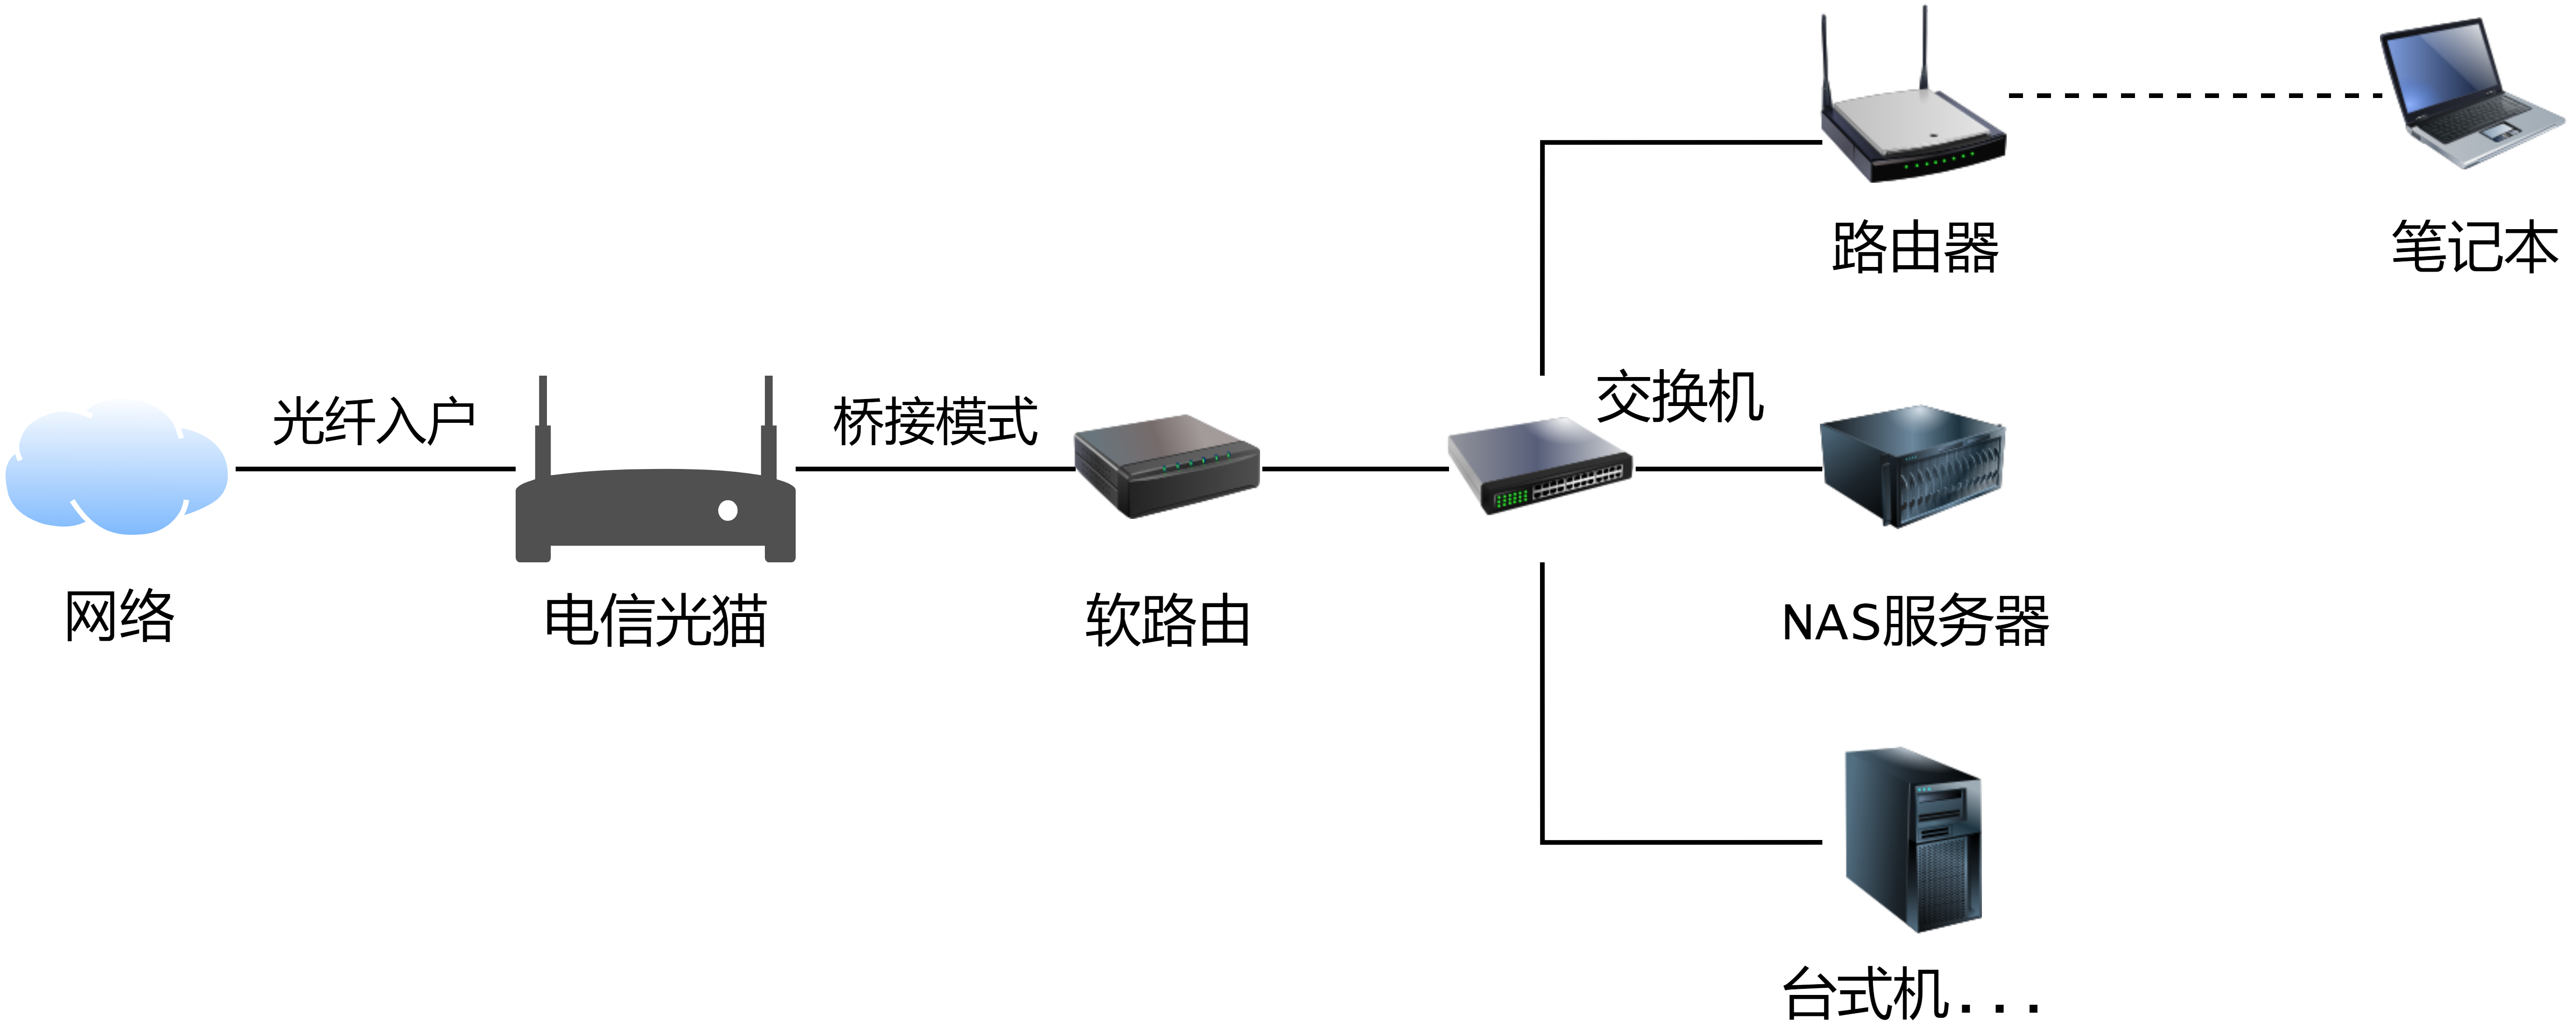
网络拓扑图如下:
- 软路由 WAN 口桥接光猫进行拨号上网
- 软路由 LAN 口接入交换机与其他设备连接作为网关
特别说明:只针对 TCP 流量使用代理,UDP 流量一般为游戏流量,机场代理网络效果不好,采用专业加速器

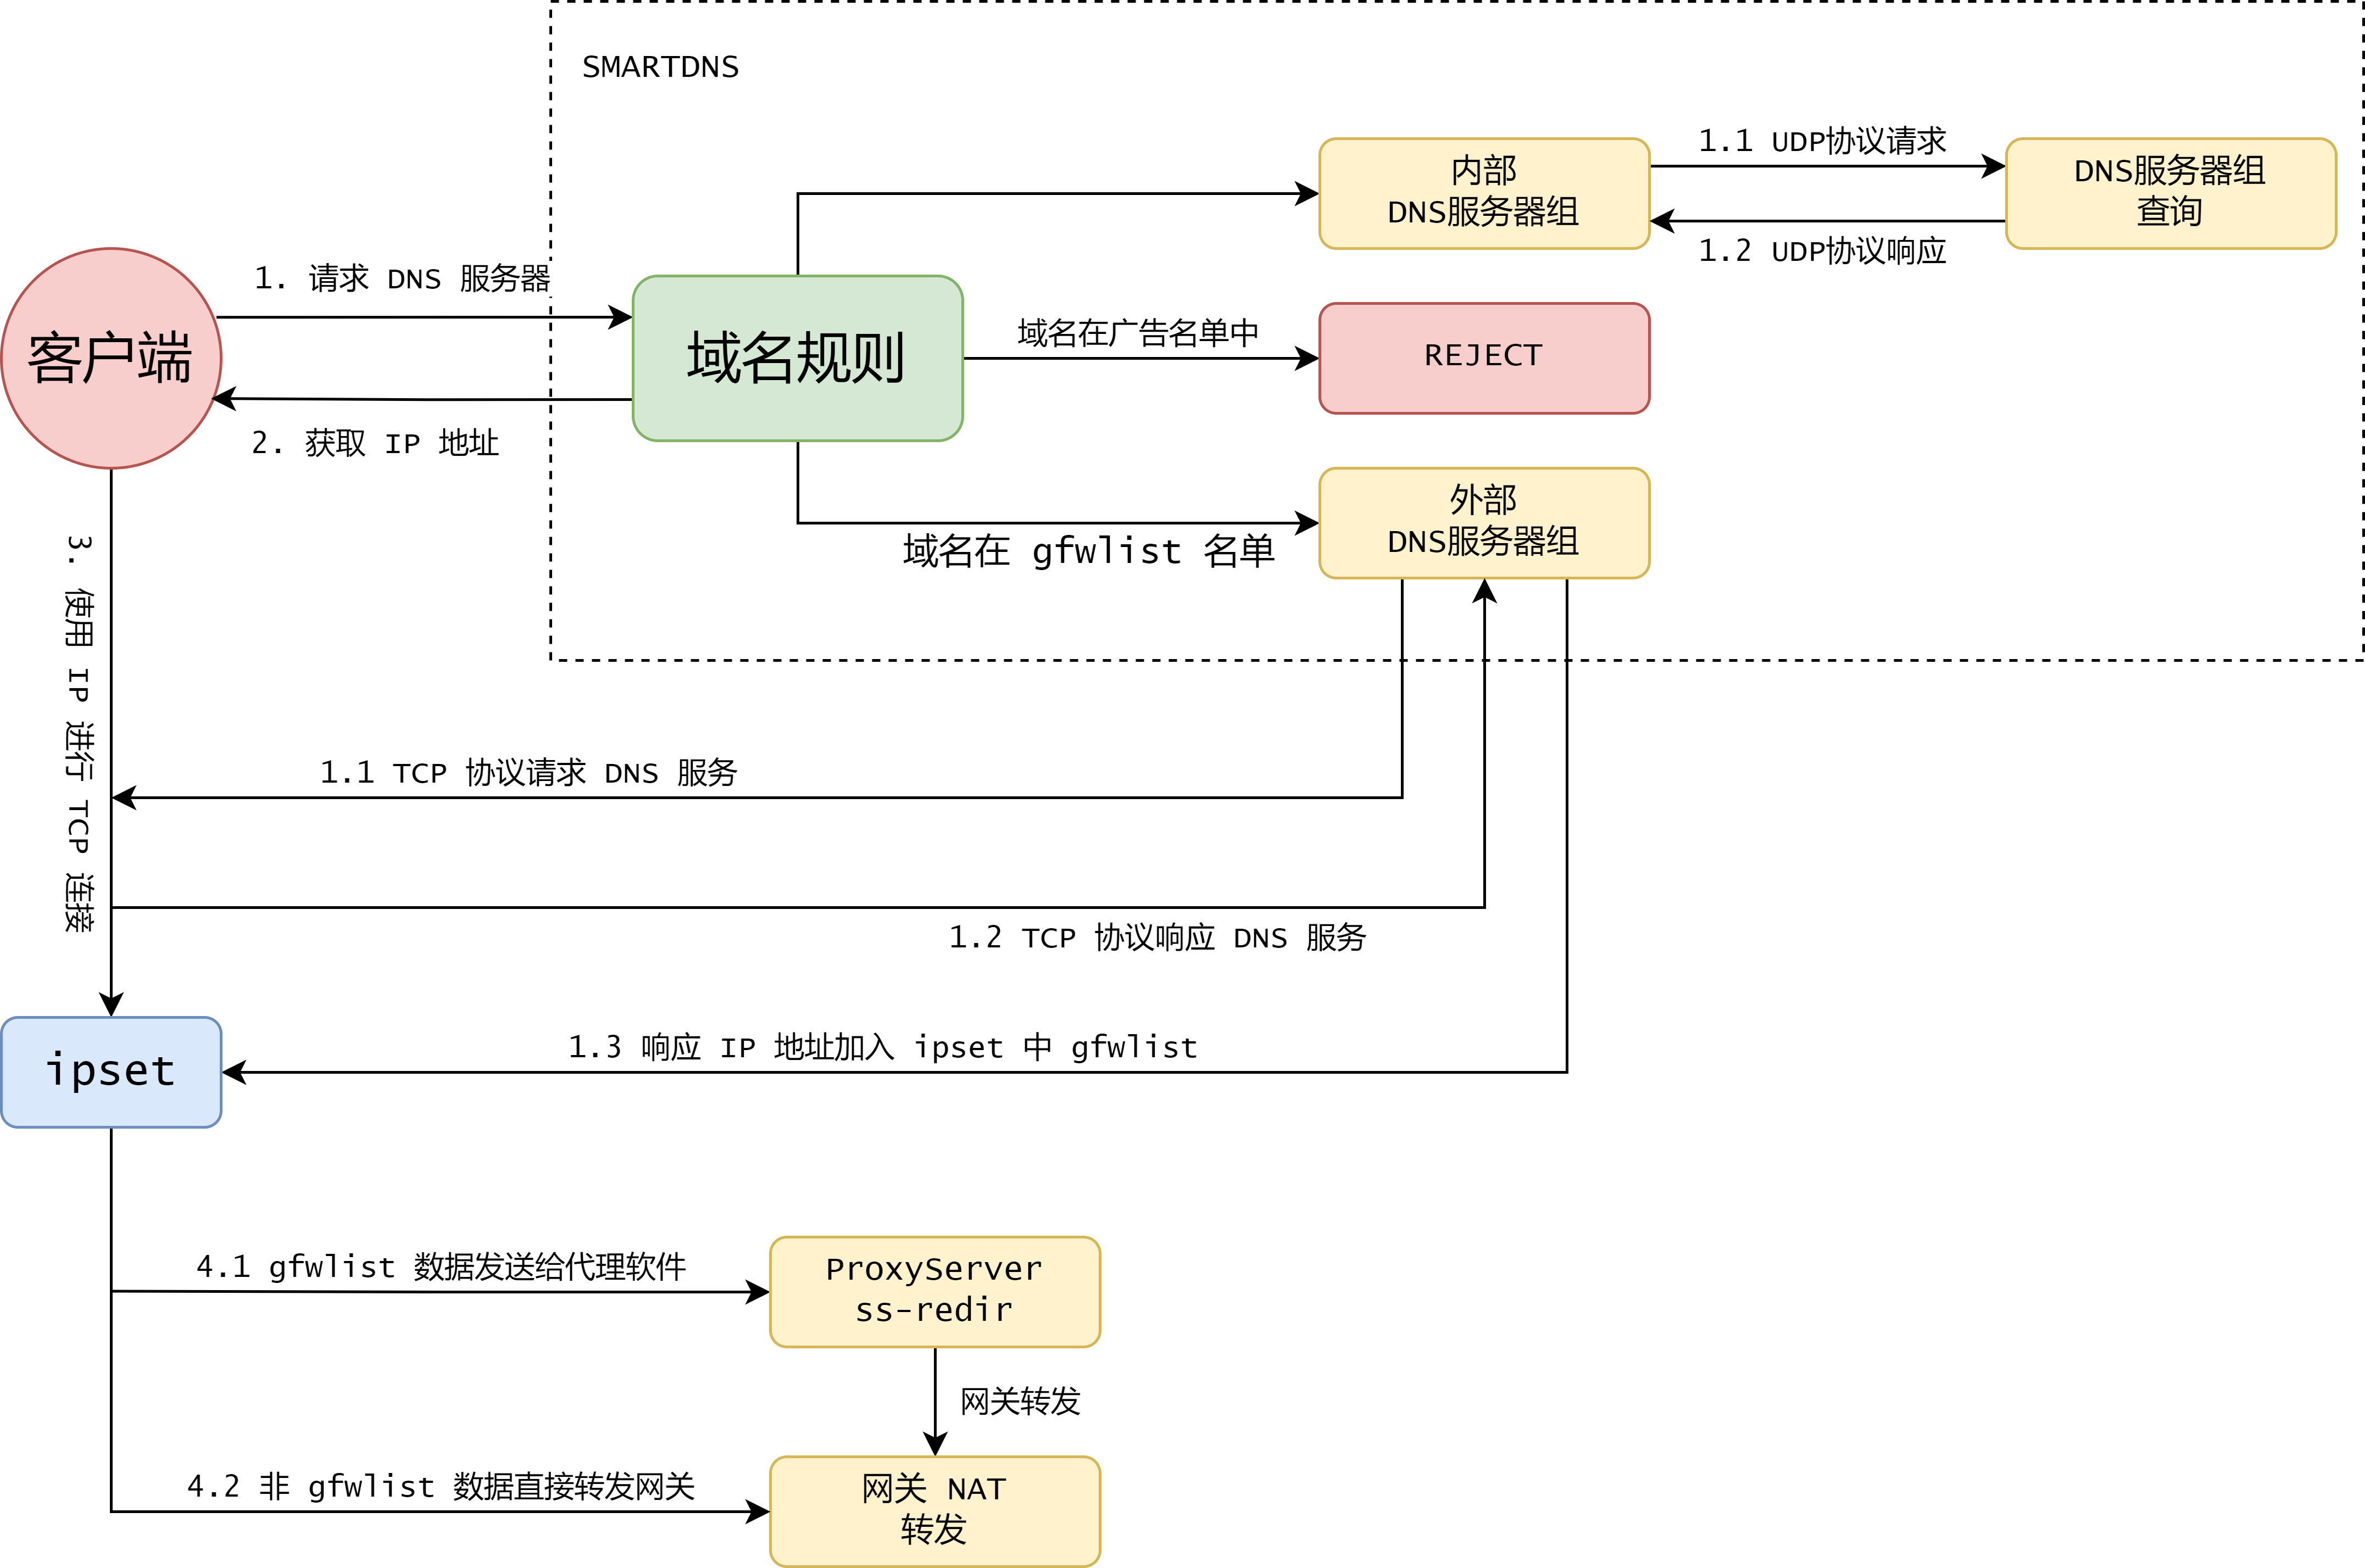
使用 smartdns / ipset / iptables / sslocal 进行流量控制,流程如图:

- 客户端请求本地部署 smartdns 服务器,进行域名查询。
- smartdns 根据配置域名规则,gfwlist 列表中域名使用 TCP 协议查询 DNS 服务器获取 IP 查询结果,广告域名直接返回空 IP,其他域名使用 UDP 协议查询 DNS 服务器获取 IP 查询结果。
- 为防止 TCP 查询结果产生 DNS 污染,均使用国外 DNS 服务器,所以 DNS 服务器 IP 加入 ipset 列表中。
- 将 gfwlist 列表中查询到的 IP 结果加入 ipset 列表中。
- 访问 IP 时判断 IP 是否在 ipset 列表中,若在,则转发流量到 ss-redir 进行代理访问,否则直接通过网关访问。
步骤
注意:请删除文件中所有;注释的文字。
一、网卡配置
配置 WAN 口(/etc/systemd/network/20-wan.network)。
;使用名字或者 MAC 地址
[Match]
Name=eth0
;MACAdress=xx:xx:xx:xx:xx:xx

;这里设置为本地地址,交由 smartdns 处理
[Network]
DNS=127.0.0.1

;关闭从上游获取 DNS 服务器地址
[DHCPv4]
UseDNS=false
配置 LAN 口(/etc/systemd/network/20-lan.network)。
;使用名字或者 MAC 地址
[Match]
Name=eth1
;MACAdress=xx:xx:xx:xx:xx:xx

;为 LAN 口分配静态地址
[Network]
Address=10.10.10.1/24
二、拨号上网
使用 ppp 进行拨号上网,在/etc/ppp/peers/下创建文件telecom(自行修改配置文件名)。
plugin pppoe.so
;拨号的接口名
eth0
;宽带上网账号
name "XXXXXXXXXX"
persist
defaultroute
hide-password
noauth
;日志位置
logfile /var/log/ppp/pppoe-telecom.log
进行拨号,和开机启动配置。
# 修改 telecom 为 /etc/ppp/peers 下文件名
systemctl start ppp@telecom
systemctl enable ppp@telecom
# 查看拨号结果,分配 IP 信息等
systemctl status ppp@telecom
三、DHCP 服务器
配置 DHCP 服务器:/etc/dhcpd.conf。
default-lease-time 600;
max-lease-time 7200;

log-facility local7;

; LAN 口的地址
subnet 10.10.10.0 netmask 255.255.255.0 {
    option subnet-mask 255.255.255.0;
    option domain-name-servers 10.10.10.1;
    option routers 10.10.10.1;
    range 10.10.10.20 10.10.10.100;
}

; 固定 IP 地址
host router {
    hardware ethernet xx:xx:xx:xx:xx:xx;
    fixed-address 10.10.10.10;
}

host nas {
    hardware ethernet xx:xx:xx:xx:xx:xx;
    fixed-address 10.10.10.11;
}
启动和开机自启动配置。
systemctl start dhcpd4
systemctl enable dhcpd4
# 查看启动状态
systemctl status dhcpd4
四、SmartDNS 服务器
配置 SmartDNS 服务器。
# 日志等级
log-level info
# 监听 53 端口
bind [::]:53
# DNS 上游服务器配置
server 119.29.29.29
server 223.5.5.5
server 114.114.114.114
server 119.29.29.29
# 以下 DNS 查询走 TCP 需要代理
# 需要手动放入 ipset gfwlist
server-tls 8.8.8.8:853 -group GFW -exclude-default-group
server-https https://1.1.1.1/dns-query -group GFW -exclude-default-group
server-https https://8.8.4.4/dns-query -group GFW -exclude-default-group
# 启用缓存和持久化
cache-size 32768
cache-persist yes
cache-file /tmp/smartdns.cache
prefetch-domain yes
serve-expired yes
# AD LIST
conf-file /etc/smartdns/anti-ad-smartdns.conf
# LOCAL LIST
conf-file /etc/smartdns/local-smartdns.conf

# 使用 GFW 组 DNS 服务器走代理
# 加入 ipset gfwlist
domain-set -name gfwlist -file /etc/smartdns/gfwlist.conf
domain-rules /domain-set:gfwlist/ -ipset gfwlist -nameserver GFW
获取 anti-ad-smartdns.conf 和gfwlist.conf,local-smartdns.conf根据需要调整。
#!/bin/bash
curl -sS https://raw.githubusercontent.com/privacy-protection-tools/anti-AD/master/anti-ad-smartdns.conf > anti-ad-smartdns.conf

curl -sS https://raw.githubusercontent.com/hq450/fancyss/master/rules/gfwlist.conf | grep "ipset" | sed --e "s/ipset=\/\.//" -e "s/\/gfwlist//"> /tmp/gfwlist0.conf
curl -sS https://raw.githubusercontent.com/Loyalsoldier/v2ray-rules-dat/release/gfw.txt > /tmp/gfwlist1.conf

cat /tmp/gfwlist0.conf /tmp/gfwlist1.conf | sort | uniq > ./gfwlist.conf
启动和开机自启动配置。
systemctl start smartdns
systemctl enable smartdns
# 查看启动状态
systemctl status smartdns
五、防火墙 iptables 配置
流量数据流如下图所示,左侧为入站流量,中间为转发流量,右侧为出战流量,中间上部为站点出入流量。

iptables -t nat -N SS
iptables -t nat -A SS -p tcp -j REDIRECT --to-ports 1080

# gfwlist 名单中 ip 走代理
iptables -t nat -A PREROUTING -p tcp -m set --match-set gfwlist dst -j SS
iptables -t nat -A OUTPUT -p tcp -m set --match-set gfwlist dst -j SS

# 内网包修改源地址为外网 IP
# pppoe 包单独处理
iptables -t nat -A POSTROUTING -o ppp0 -j MASQUERADE
iptables -t mangle -A FORWARD -o ppp0 -p tcp -m tcp --tcp-flags SYN,RST SYN -j TCPMSS --clamp-mss-to-pmtu
# 配置 ipset
ipset -N gfwlist hash:net
# DNS 服务器
ipset -A gfwlist 8.8.8.8
ipset -A gfwlist 8.8.4.4
ipset -A gfwlist 1.1.1.1
# TELEGRAM IP 段
ipset -A gfwlist 91.108.56.0/22
ipset -A gfwlist 91.108.4.0/22
ipset -A gfwlist 91.108.8.0/22
ipset -A gfwlist 91.108.16.0/22
ipset -A gfwlist 91.108.12.0/22
ipset -A gfwlist 149.154.160.0/20
ipset -A gfwlist 91.105.192.0/23
ipset -A gfwlist 91.108.20.0/22
以上脚本可配置到开机自启动脚本中。
六、Shadowsocks 透明代理
这里使用rust版的ss进行代理处理,需自行编译开启local-redir和stream-cipher特性。
启动命令如下,xxx.conf为你的代理服务器配置文件。
sslocal -c xxx.conf --protocol redir -b "0.0.0.0:1080"七、IPV6 地址获取
使用wide-dhcpv6从上游获取ipv6地址,配置文件/etc/wide-dhcpv6/dhcp6c.conf。
; 从 ppp0 接口获取
interface ppp0 {
    send ia-pd 0;
};

id-assoc pd 0 {
    ; 分配给 lan 口
    prefix-interface eth1 {
        sla-id 1;
        sla-len 4;
    };

};
启动和开机自启动配置。
# ppp0 更改为你设定的 wan 口
systemctl start dhcp6c@ppp0.service
systemctl enable dhcp6c@ppp0.service
# 查看获取的 ipv6 前缀信息
systemctl status dhcp6c@ppp0.service可能出现的问题:还未拨号成功,wide-dhcpv6就去获取ipv6地址,会导致该服务失败,可以在/usr/lib/systemd/system/dhcp6c\@.service中添加ExecStartPre=/usr/bin/sleep 60。
八、IPV6 前缀委派
使用radvd进行ipv6地址前缀委派,配置文件/etc/radvd.conf。
; 需要委派的接口
interface eth1 {
    AdvSendAdvert on;
    ; 时间设置
    MinRtrAdvInterval 3;
    MaxRtrAdvInterval 10;

    ; 自动获取接口的前64位
    ; 也可以手动配置
    prefix ::/64 {
        AdvOnLink on;
        AdvAutonomous on;
        AdvRouterAddr on;
    };
};
启动和开机自启动。
systemctl start radvd
systemctl enable radvd
# 查看状态
systemctl status radvd
2 条评论
划水
主题好看